Stop-motion setup essentials
- Jan 6
- 2 min read
"Stop-motion is all about control" once said Kevin Parry.
Control over what the camera sees, what it doesn’t, and how consistent that view stays over hours or sometimes days of animation. Before a single frame is animated, the setup does a lot of the invisible work for you.
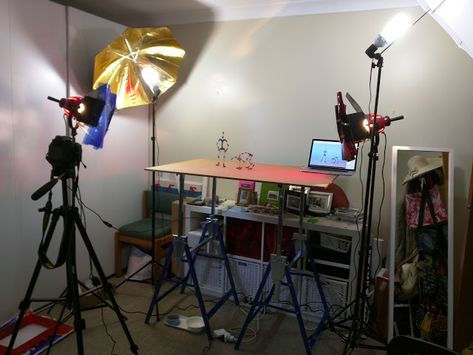
Let’s start with the room.
Ideally, your shooting space should be fully covered, with no natural light entering the set. As tempting as daylight can be, it’s unpredictable. Clouds move, the sun shifts, and suddenly your scene looks different from one frame to the next. Blocking out natural light gives you complete control over what’s being lit and how. This becomes especially important when you’re shooting across multiple days. A controlled room setup is one of the simplest ways to avoid flicker and maintain visual consistency.

Next comes the table /the platform you’re animating on.
This part is non-negotiable: it should not wobble at all. Even the slightest movement can show up as jitter in your animation. Personally, I always recommend animating while standing, using a table that’s a little higher than normal. It keeps your back in better shape and prevents that constant crouching or bending over the set. Stop-motion is slow, repetitive work, and your body comfort matters more than we often admit. A comfortable animator is a more patient animator.

Before you start animating, pause and look around your setup.
Where is your monitor placed? PS: I like to keep it the same height as the animation stage. Where are you standing while animating? Are you constantly twisting your body to look at the screen and then back at the puppet? These small movements add up when you’re repeating them hundreds or thousands of times. Try to arrange things so your movements feel natural and minimal. Your future self will thank you halfway through the shot.
Always take test frames.
Check your lighting, look closely at the thumbnails or preview window in Dragonframe software, and really ask yourself if this is how you want it to look. Adjust what needs adjusting before you commit. There’s nothing worse than reaching the end of a shot and realizing you could have done it better if you’d just taken a few extra minutes at the start.
When it comes to camera settings, I’ve found that a shutter speed somewhere around 1/15 to 1/35 usually gives flicker-free frames, especially with controlled lighting. This can vary depending on your setup, but it’s a solid starting point.
One last thing that often gets overlooked: avoid placing direct lights that point toward your eyes. It causes unnecessary fatigue and strain, and long sessions under harsh light can really wear you down. Good lighting should serve the scene, not torture the animator.
In the end, stop-motion setups aren’t just about gear. They’re about creating a space where you can focus, stay consistent, and actually enjoy the process. The more control you build into your setup, the more freedom you’ll feel when it’s finally time to animate.


Comments